10-Minute Keto Garlic Bread Chaffle Recipe
Craving an easy keto-friendly garlic bread? This cheesy garlic chaffle bread will satisfy with its Italian seasoning, melty mozzarella, and crispy, garlicky warmth. Made in a mini waffle maker, this few-ingredient chaffle batter bakes up in minutes into the best quick keto garlic bread.

Last week, I made one of my kids’ favorite dinners, spaghetti. It is an easy and family-friendly dinner to whip up quickly, especially since I keep ground beef browned in the freezer. I make noodles for the kids and roast spaghetti squash for the hubs and me to keep our dinner low-carb.
I miss garlic bread with my spaghetti, so I thought I’d start with the basic chaffle recipe and make a few adjustments to make keto-friendly cheesy garlic chaffle bread.
Ingredients You Need for Cheesy Garlic Chaffle Bread:
Egg: Holds the mixture together to help it keep its shape
Mozzarella Cheese: Gives low-carb garlic bread flavor, creaminess, and stretchiness
Parmesan Cheese: Adds a salty, savory taste
Coconut Flour: Helps soak up moisture and makes the texture sturdy
Baking Powder: Makes the batter rise more
Italian Seasoning: Adds an Italian flavor
Salt: Brings out the flavors
Butter: Makes the keto garlic bread taste richer
Garlic Powder: Gives it a garlicky taste
Basil: Provides a fresh flavor
Cheesy Garlic Chaffle Step-By-Step
I’ve included a step-by-step visual guide below to help you along the way. If you are looking for the printable recipe card with the complete ingredient list and detailed instructions, scroll to the very bottom of this post.
Step 1: Preheat your waffle maker. If you use the Dash Mini Maker, the light will come on when you plug it up and go off when it is preheated. Coat or brush the top and bottom plates with butter or olive oil, or use cooking spray.
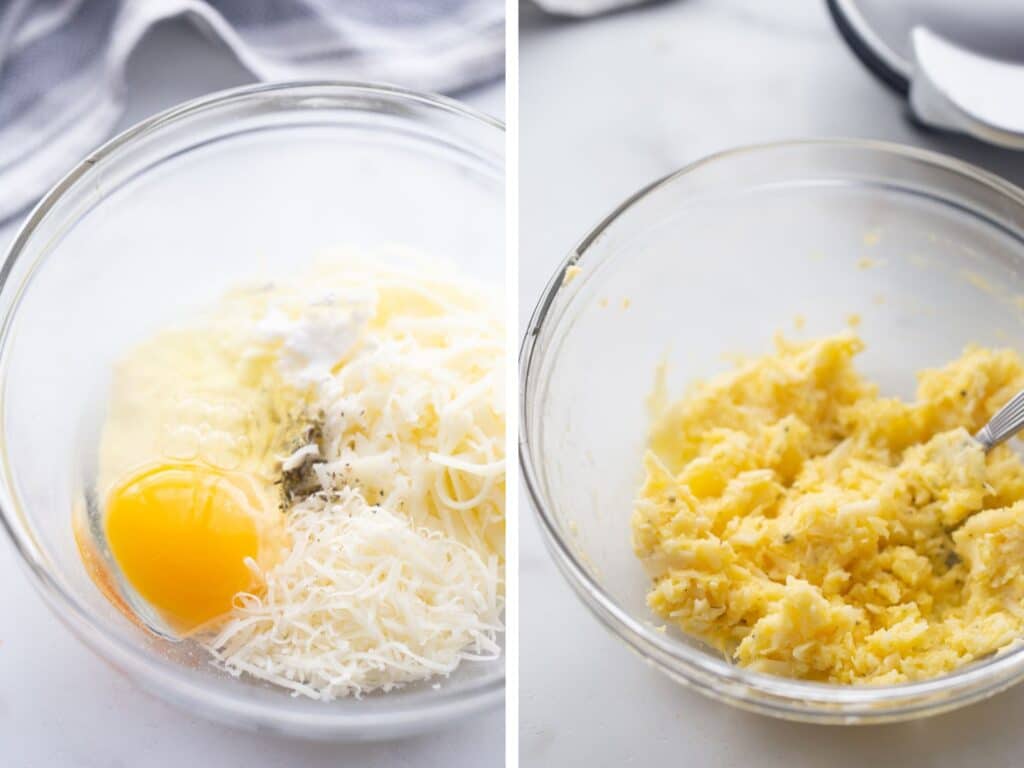
Step 2: To make your batter, add the egg, shredded mozzarella, parmesan cheese, coconut flour, baking powder, Italian seasoning, and a pinch of salt in a small bowl. Stir to combine all ingredients well using the fork.

Step 3: Spoon half of the batter onto the bottom waffle plate. I use the back of the spoon to spread the batter evenly to the edges. Close the lid and cook for 3-4 minutes or until golden brown.
Tip: I know it’s tempting to peek inside the waffle maker to check on your chaffle’s progress – trust me, I’ve been there! I’ve learned from personal experience that if you lift the lid too early before the chaffle has had a chance to set properly, you might end up with a bit of a mess on your hands. The batter can separate, leaving part stuck to the waffle maker’s top and the rest on the bottom. So, resist the urge to take a sneak peek and give it time to cook. lol

Repeat with Remaining Batter
Step 4: Carefully remove the chaffle. I use a fork to lift an edge so I don’t burn myself. Repeat the process with the remaining chaffle batter. Make sure to wait a minute or two after you’ve removed it from the waffle iron. Some of the steam is released as it cools, which helps it crisp.

Step 5: Now, let’s get to the good stuff. 😋 Melt butter and stir in garlic powder in a small bowl. Using a serrated knife, slice cooked chaffles in halves or thirds. Arrange chaffle pieces in a single layer on a baking sheet and slather on some garlic butter.
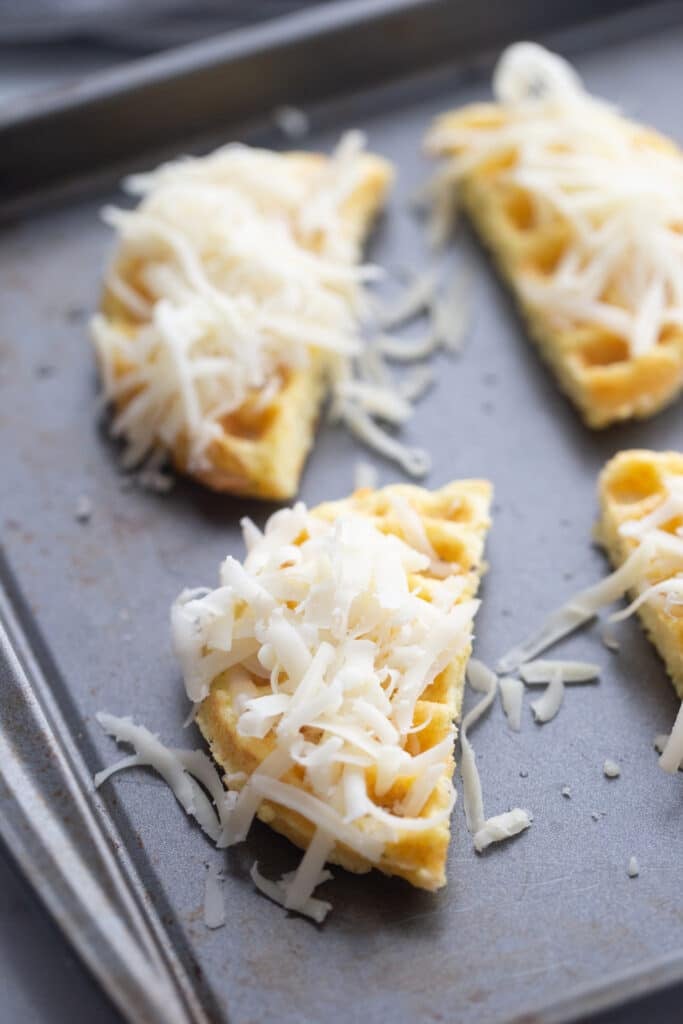
Step 6: Sprinkle 1⁄2 cup mozzarella cheese evenly over the pieces. Bake at 400°F just until the cheese melts, about 4-5 minutes. For a crispier finish, switch the oven to broil and place the pan on the top rack for 1-2 minutes until the surface browns slightly. You have to be careful with broiling and watch carefully, or you’ll have burnt chaffles in no time!
You won’t believe how good they taste, and your kitchen will smell like your favorite Italian restaurant. They are such a yummy addition to spaghetti night around here.
Pro Tips and Tricks for Perfect Garlic Chaffles
- Fresh is Best: Freshly shredded mozzarella is always better than pre-shredded. Preshredded cheese has a starch added to it that prevents it from sticking together, but it also affects how it melts. And freshly shredded always tastes so much better.
- Grease Well: Make sure to grease the waffle iron well. Chaffles have little batter and stick easily without enough oil or butter coating the plates.
- Room-Temp Eggs: Use room-temperature eggs rather than cold eggs for the best texture. Eggs blend easier at room temperature!
- Precision is Key: Measure the coconut flour correctly, or the ratio of ingredients will be off. If you use even a tiny bit too much it could cause your garlic chaffle bread to be dry as a dessert because coconut flour is SO ABSORBENT.
Check out this list of ultimate tips for the best crispy chaffles for more ideas.

Frequently Asked Questions
What Makes Chaffles Keto?
I love that chaffles use low-carb ingredients like eggs, cheese, and coconut or almond flour instead of regular flour. Plus, they’re gluten-free, which is a bonus for those with gluten sensitivities.
What Do I Use to Make Keto Cheesy Garlic Chaffle Bread?
Dash mini waffle makers are definitely the star of the chaffle show, but you could use any waffle maker you already have. Remember that most chaffle recipes you see online are geared for the Dash Mini Waffle Maker, which makes a 4-inch chaffle, so you may need to adjust the batter you use in a regular waffle iron and the cooking time.

I bought mine at TJMaxx several years ago, but I’ve seen them at Kohl’s, Walmart, Target, Bed Bath & Beyond, Sam’s Club, and GoodWill.

If you have a big family or want to make several at once, this waffle maker makes four 3-inch waffles at a time. You would need to use a little less batter, but it would be a huge time saver.
What can I use instead of an Italian herb blend?
You can substitute dried basil, oregano, thyme, or rosemary instead.
Do I have to broil the chaffles?
Broiling the chaffles is totally optional, but I highly recommend it if you love a crispy, browned cheese topping as much as I do! It’s an extra step that takes just a few minutes, but it takes these garlic chaffles to the next level. If you prefer a softer texture, feel free to skip the broiling – they’ll still be delicious!
What fat can I use instead of butter to brush the chaffles?
Olive oil, coconut oil, or avocado oil work well instead.
Can I use bacon fat instead of butter?
Absolutely! In fact, using bacon fat instead of butter is one of my favorite ways to add more flavor to these garlic chaffles. Whenever I cook bacon, I save the fat just for recipes like this. The smoky, savory notes pair perfectly with the garlic and cheese. Give it a try—I think you’ll love it as much as I do!
Besides eggs, what holds chaffles together?
The cheese also acts as a binder.
How to serve Cheesy Garlic Chaffle?
Whether you serve the Keto Cheesy Garlic Bread Chaffle as a side to a meal or an appetizer, it is a crowd-pleaser. I dip them in a no-added-sugar marinara like Rao’s Pasta Sauce.
Storing Leftover Chaffles
Chaffles taste the best fresh. To store, place them in an airtight container for up to 5 days at room temperature or freeze them for up to 3 months—separate frozen chaffles with wax paper.
Reheating Chaffles
Fresh chaffles (within five days): Bake on a sheet at 300°F for 4-5 minutes until warmed. You can also use an air-fryer.
Frozen chaffles: Bake directly on oven rack at 325°F, flipping halfway, for 12-15 minutes. You can also use an air-fryer for less time.
For the crispiest results, toast frozen chaffles in intervals of 30-60 seconds, checking frequently.
Low-Carb Garlic Bread Recipe Variations
- Get Creative with Cheese: Use cheddar, pepper jack, or goat cheese instead of mozzarella.
- Herbs and Spices: Replace Italian seasoning with 1⁄4 tsp dried oregano, basil, thyme, or rosemary
- Change the Flour: You can use almond flour instead of coconut flour, but you will need one tablespoon as the conversion rate is 1:4.
- Garlic Options: Omit garlic powder or use fresh minced garlic
- Mix-ins Galore: Add caramelized onions, cooked spinach, crumbled bacon, sliced tomatoes, or other keto-friendly toppings
Keto Recipes to Enjoy with Keto Garlic Bread Chaffle
- Keto Lasagna
- Baked Keto Spaghetti Casserole
- Keto Baked Italian Sausage
- Lazy Chicken Parmesan Casserole
- Spaghetti Squash Lasagna Boats
- Italian Meatball Casserole
- Keto Buffalo Wings
More Savory Keto Chaffle Recipes:

Full Detailed Recipe for Keto Cheesy Garlic Chaffle Bread
Ingredients
- 1 egg
- 1/2 cup mozzarella cheese, shredded
- 1 tbsp parmesan cheese
- 3/4 tsp coconut flour
- 1/4 tsp baking powder
- 1/8 tsp Italian Seasoning
- pinch of salt
- 1 tbsp butter, melted
- 1/4 tsp garlic powder
- 1/2 cup mozzarella cheese, shredded
- 1/4 tsp basil seasoning
Instructions
- Preheat oven to 400 degrees. Plug the Dash Mini Waffle Maker in the wall and allow it to get hot. Lightly grease waffle maker.
- Crack the egg into a small mixing bowl and beat lightly with a fork until blended. Add the shredded mozzarella, parmesan cheese, coconut flour, baking powder, Italian seasoning, and a pinch of salt to the beaten egg. Stir to combine.
- Spoon half of the batter on the waffle maker and close. Cook for 3-4 minutes or until golden brown.
- Remove the chaffle bread carefully from the Dash Mini Waffle Maker, then repeat for the rest of the batter.
- In a small bowl, melt the butter and add garlic powder. Cut each chaffle in half (or thirds) and place on a baking sheet, then brush the tops with the garlic butter mixture.
- Top with mozzarella cheese and pop in the oven for 4 -5 minutes.
- Turn oven to broil and move the baking pan to the top shelf for 1-2 minutes so that the cheese begins to bubble and turn golden brown. Watch VERY carefully, as it can burn quickly on broil. (I check every 30 seconds)
- Remove from oven and sprinkle basil seasoning on top. Enjoy!
Want to save this recipe?
Notes
- Use freshly shredded mozzarella instead of pre-shredded for better melting. The starch used to prevent caking compromises melting.
- Make sure to grease the waffle iron well. Chaffles have little batter and stick easily without enough oil or butter coating the plates.
- Don't open the waffle maker early or the
- Use room-temperature eggs rather than cold eggs for the best texture. Eggs blend easier at room temp!
- Chaffles taste the best fresh. To store, place in an airtight container for up to 5 days at room temperature or freeze for up to 3 months -separate frozen chaffles with wax paper.
- Fresh chaffles (within 5 days): Bake on a sheet at 300°F for 4-5 minutes until warmed through. You can also use an air-fryer or mini waffle maker.
- Frozen chaffles: Bake directly on oven rack at 325°F, flipping halfway, for 12-15 minutes. You can also use an air-fryer for less time.
Nutrition


What if you don’t have a waffle maker?
You need a waffle maker for this recipe. The Dash Waffle maker linked in this recipe is very affordable.
I make it in my air fryer.
Delicious!! So easy to make also!! Thank you 🙂
Sure! So glad you enjoyed it.
Can I substitute gluten free flour instead of coconut?
No, I don’t think they are interchangeable. Coconut flour is very finicky, and you use only a small amount.
First time making anything on my mini waffles. My DH was very skeptical. Not anymore!!! Absolutely amazing true game changer..
Yay! That is awesome. So glad you both enjoyed it.
These were absolutely delicious!!! Thank you so much!!!
So glad you loved them.
It’s not pizza but it’s definitely yummy!!
So glad you loved it
Can you clarify the serving size for the nutrition information? 1g doesn’t seem right.
The number of servings is listed at the top of the recipe card. I then divide it evenly by that number
I’m assuming the batter could also be made in a Dash mini griddle?
It sounds good. Thank you.
I tried this recipe twice and it didn’t turn out for me. Mine didn’t look the same as the picture here when put in the dash waffle maker. Mine was too dry. I probably did something wrong, but I took this recipe out of my lineup.
Looks delicious, however 1/2 cup mozzarella is listed twice for ingredients. So I’m just wondering if it’s 1/2 cup? Or 1 cup cheese?
Hey Erin, so 1/2 goes in the mix and 1/2 will be sprinkled on top of the chaffle before you pop it in the oven. Let me know how it turns out!
Has anyone tried this recipe with egg whites only?