Easy Baked Cheddar Cheese Crackers Recipe [Keto & Gluten Free]
Looking for a tasty and healthy snack to munch on while on the keto diet? Look no further than Keto Cheese Crackers! These crunchy, savory cheddar cheese crackers are incredibly easy to make with just 4 ingredients and take only 30 minutes from start to finish! Perfect for the keto diet, they’re gluten-free, low-carb, and highly customizable – they’re an excellent option for anyone looking for a healthy snack!
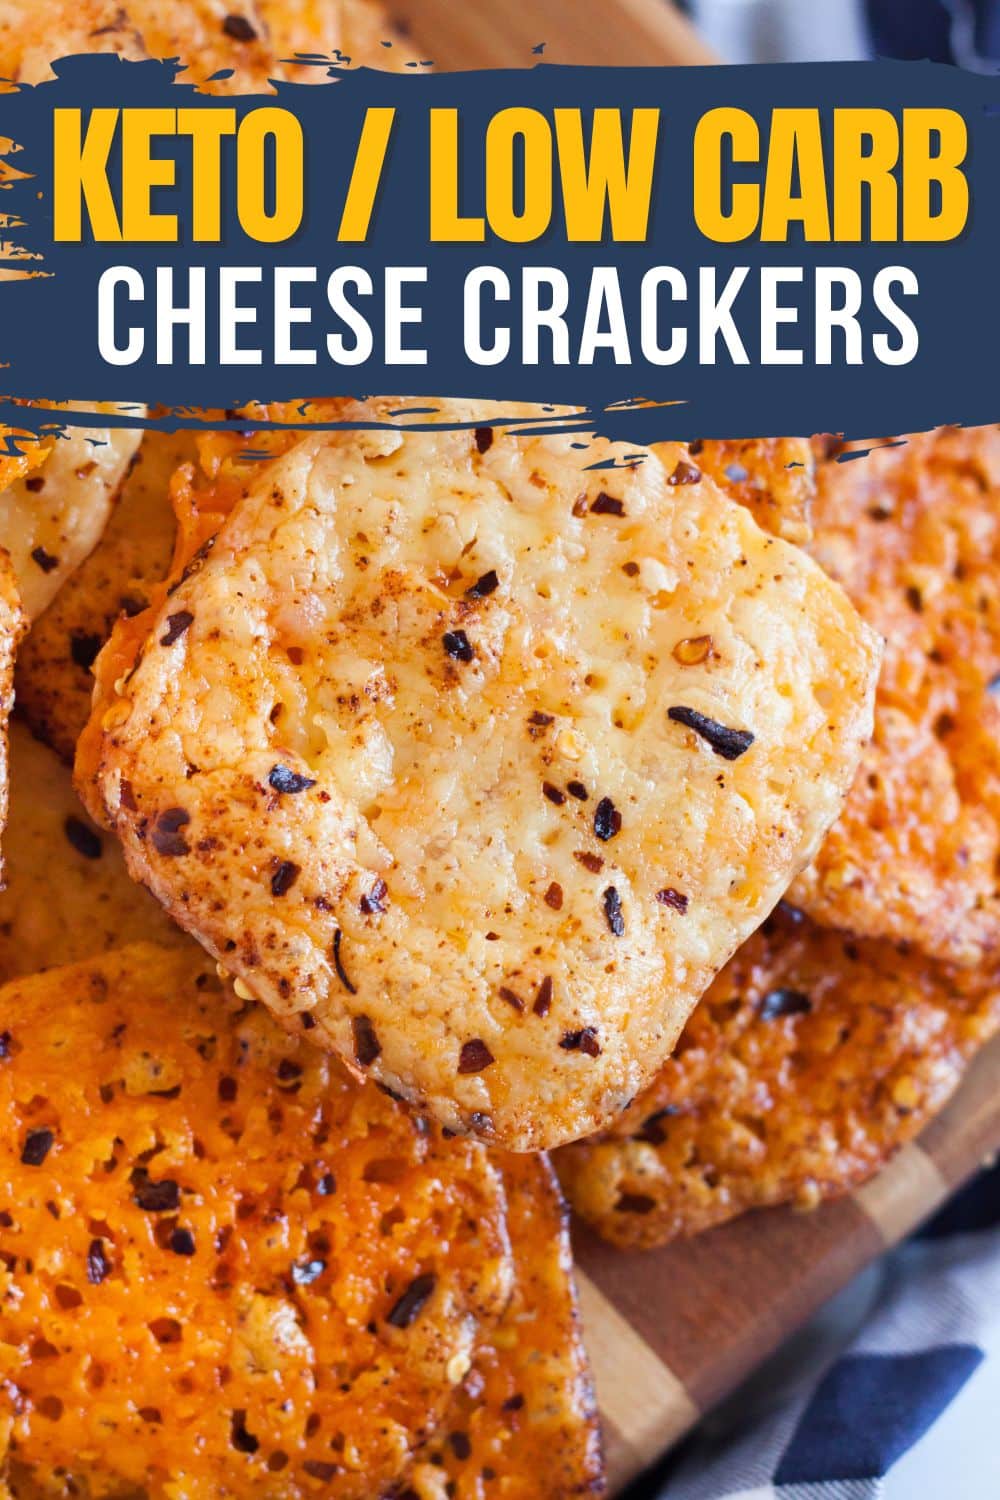
I’ve made these keto cheese crackers several times at different temperatures and baking times before finally perfecting the recipe. These have to be the most amazing and crispy keto crackers I’ve made, and they have an excellent savory taste, thanks to the extra seasoning. These Low Carb Cheese Crackers are so simple to make. The only ingredients are cheese slices and seasoning. You can’t go wrong with a recipe this easy.
If you like this low-carb snack idea, check out this Keto Pepperoni Chips Easy Snack Idea {Low Carb} as well.
Ingredients For Keto Cheddar Cheese Crackers:
- Deli Cheese Slices: You can use any flavor of cheese that you want (I typically use the variety tray from Costco).
- Red Pepper Flakes: Gives a little bit of heat.
- Paprika: Key ingredient for flavor.
- Garlic powder Adds flavor – don’t confuse this with garlic salt!
Step-By-Step Instructions:
*** I’ve included a brief step-by-step pictorial below. For the full recipe with a print option, scroll to the bottom of the page.
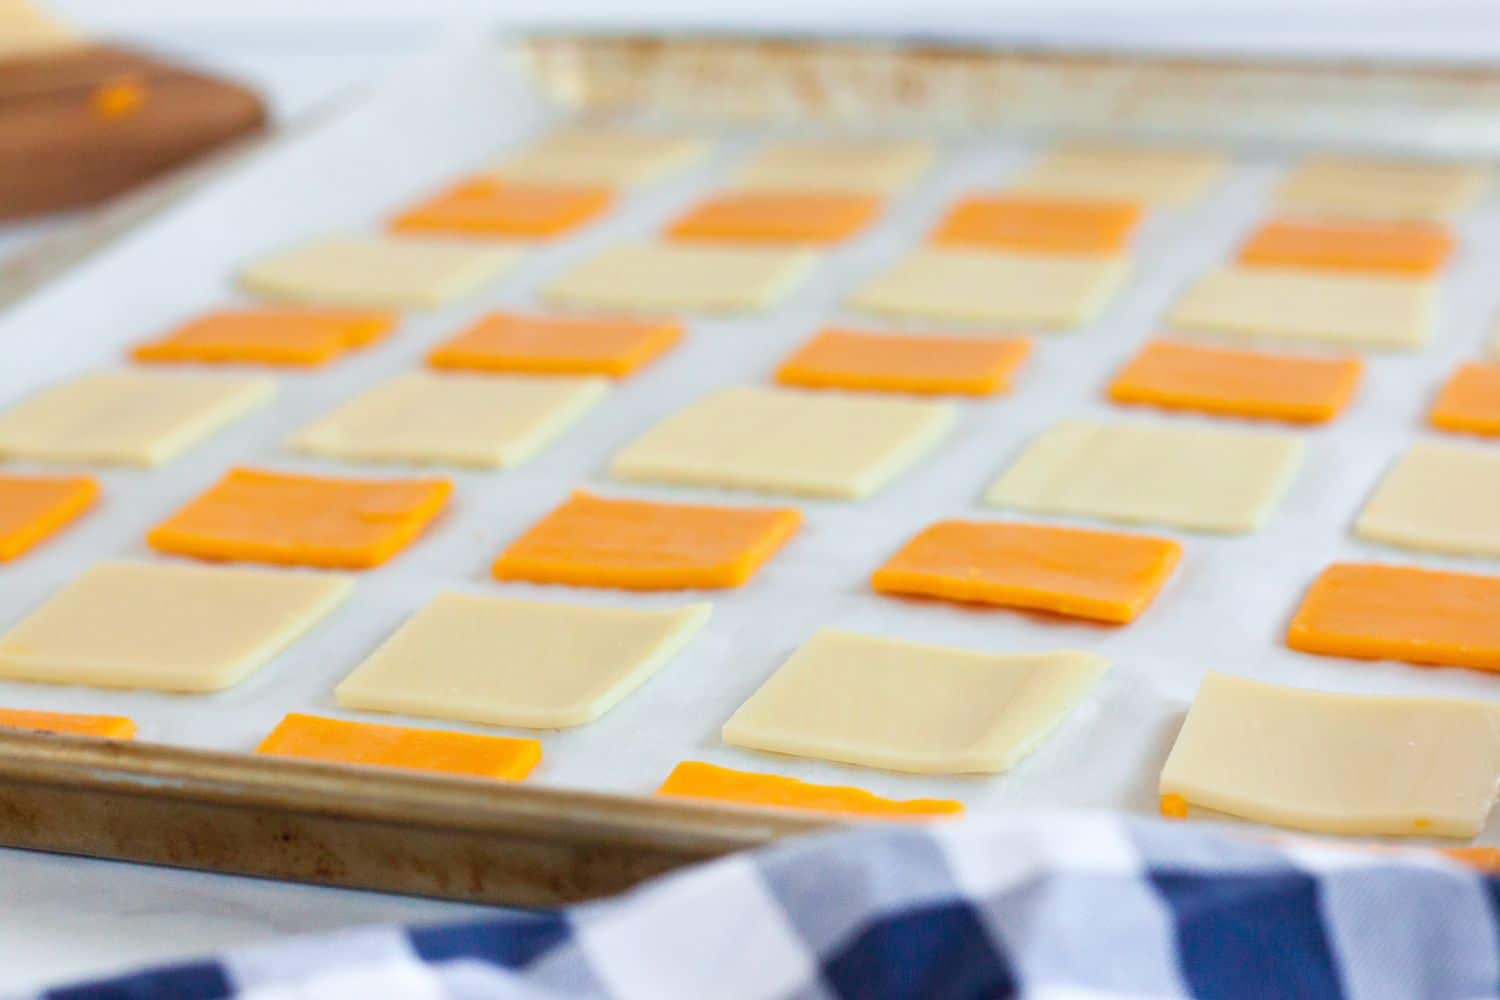
Step 1: Preheat oven & line pan
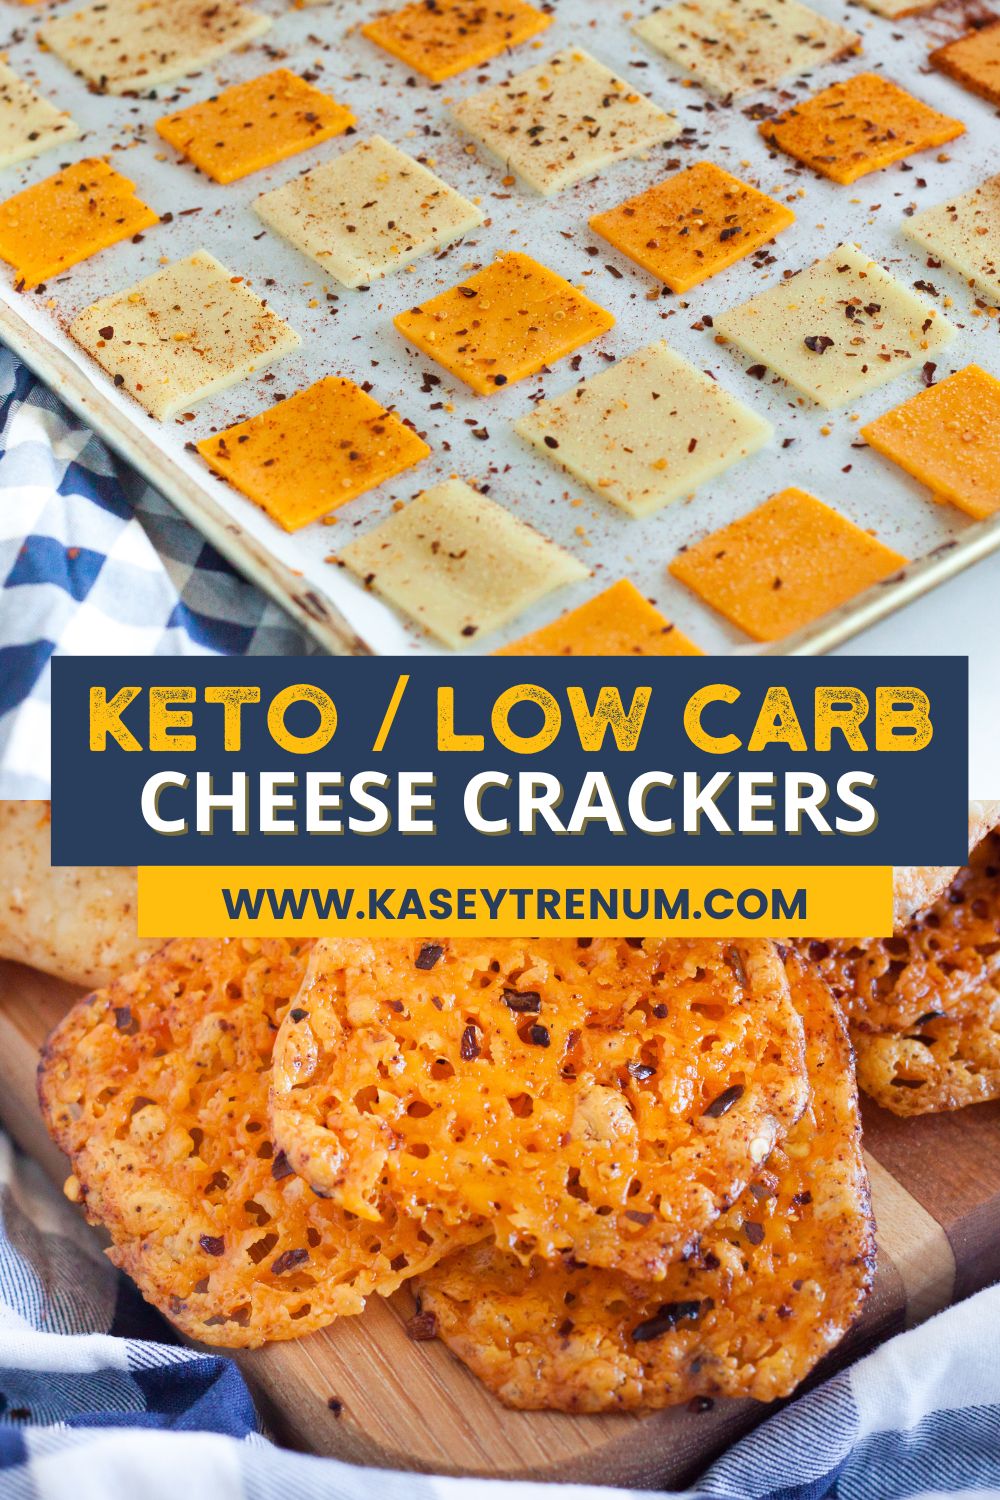
Preheat the oven and cover the cookie sheet with parchment paper. Lay cheese slices flat to fill the cookie sheet. Leave a little bit of room between each slice. I used precut slices, but you can buy larger deli slices and cut them into smaller squares.
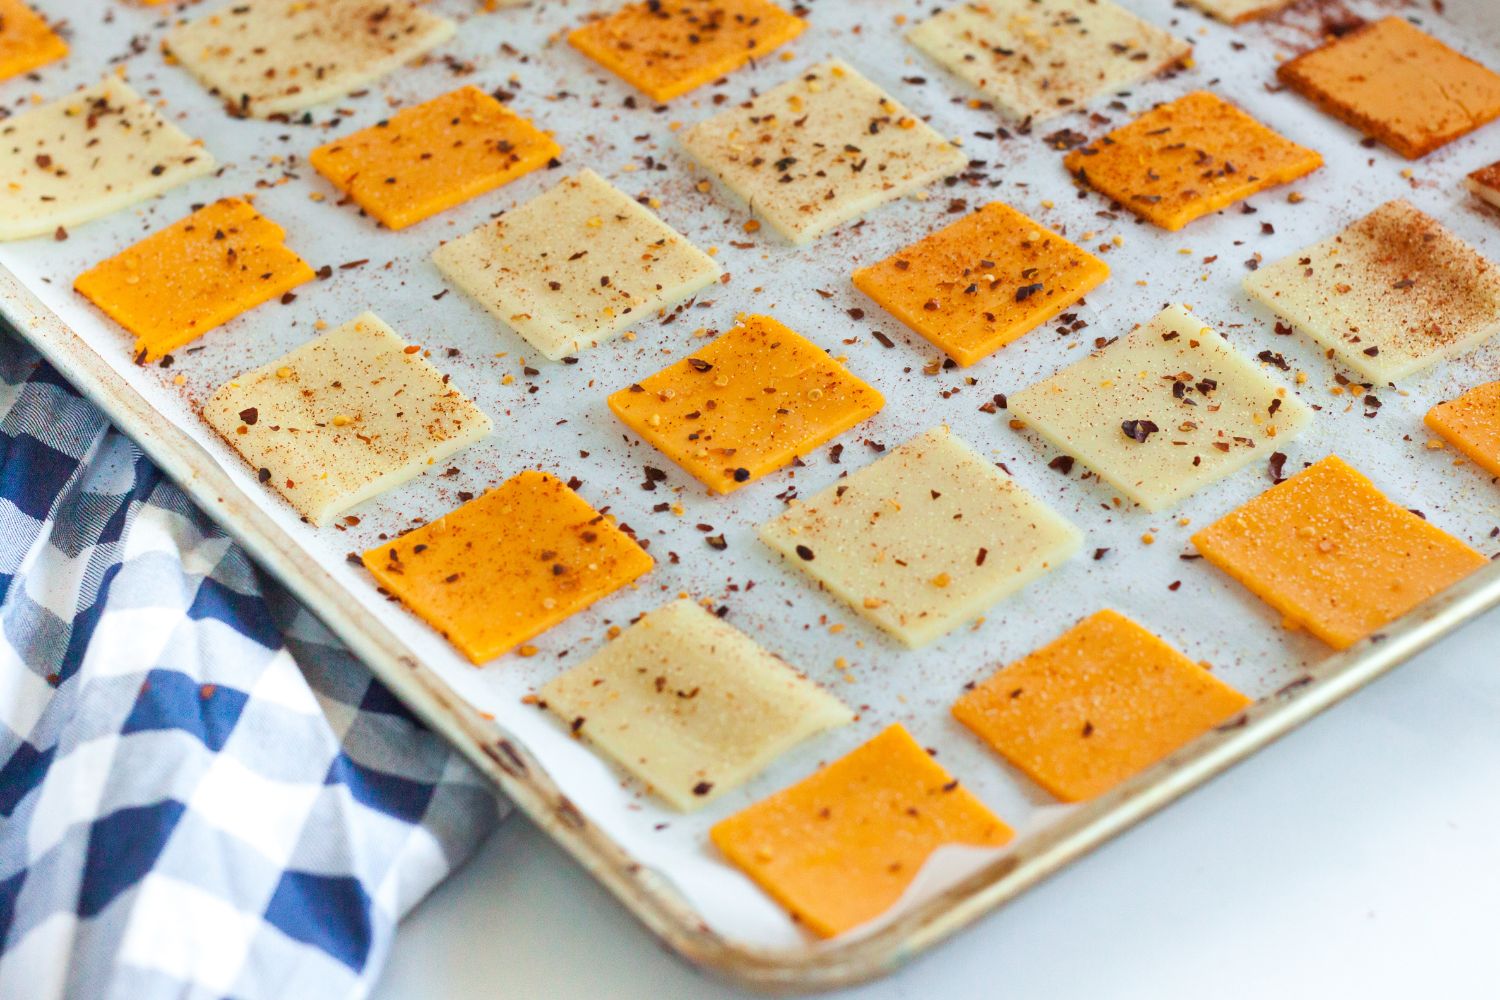
Step 2: Arrange cheese slices and Sprinkle with spices
Lay your deli cheese slices evenly across the sheet, spacing them about 1 inch apart. You want enough room that the melted cheese doesn’t all run together into one giant cracker, but some merging is fine.
Next, sprinkle the spices evenly over the arranged cheese slices. The spices I recommend are red pepper flakes, paprika, garlic powder, and optional salt. Get good coverage across all the cheese slices with the spices. A light, even coating on each slice is what you’re aiming for. The spices will bake right into the melted cheese and provide tons of extra flavor!
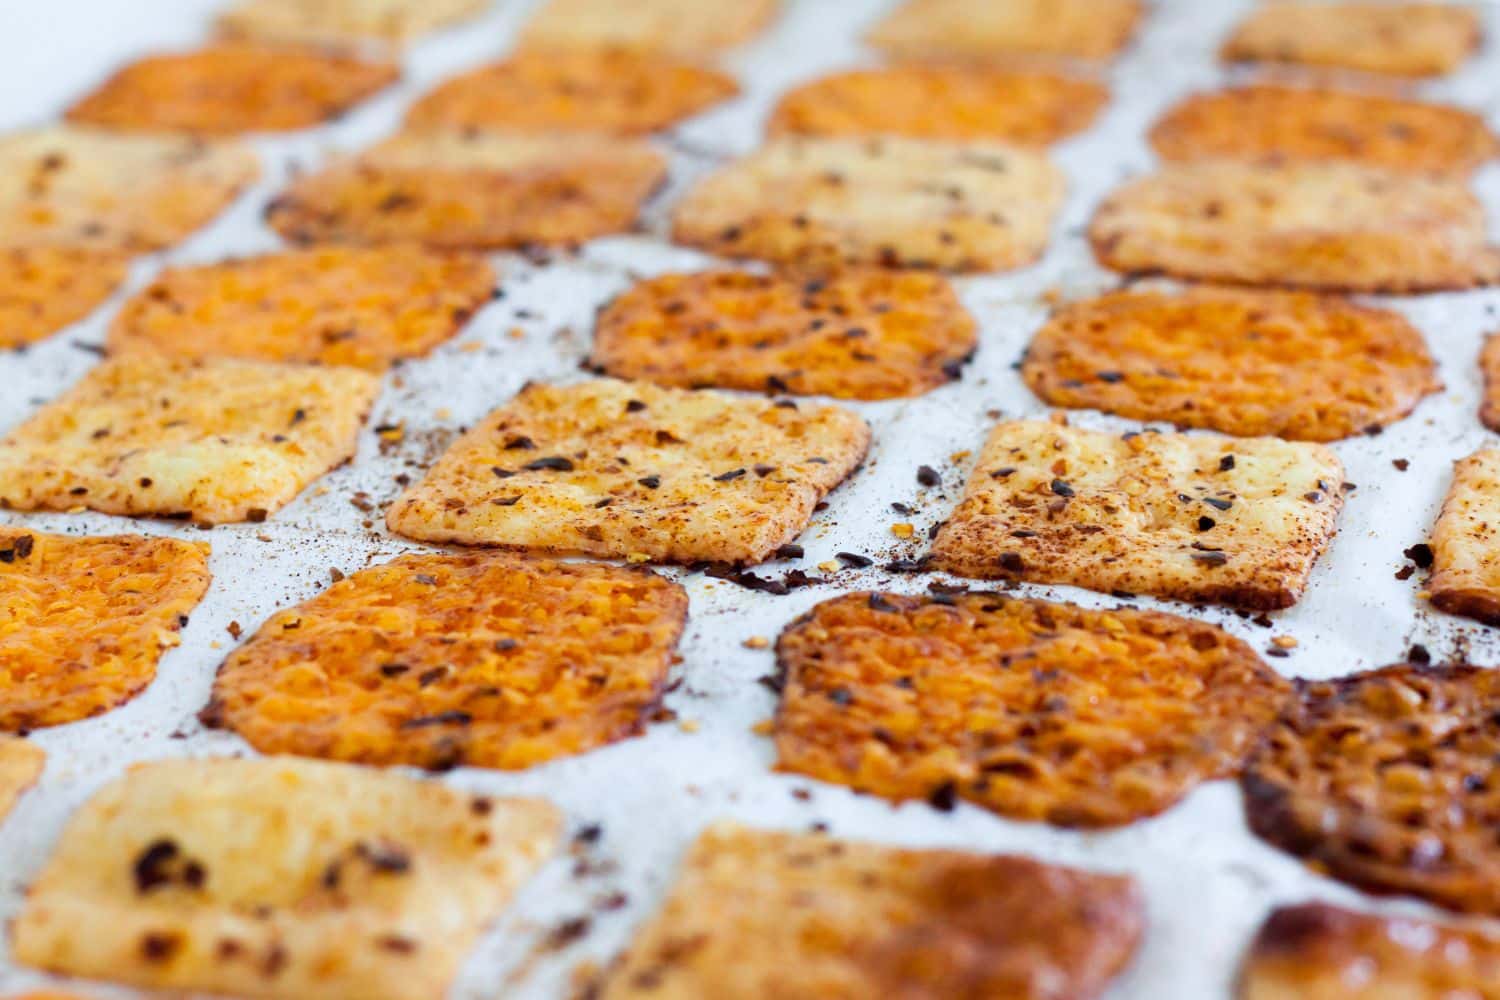
Step 4: Bake at 325°F for 23 minutes
Place the cookie sheet with seasoned cheese slices in the preheated 325°F oven. Bake for approximately 23 minutes, keeping an eye on them near the end. Baking time can vary based on the thickness of your cheese and oven calibration.
The cheese crackers are done when the edges are lightly browned and crispy. Centers may still look soft. That’s okay! They’ll firm up while cooling. Remove from oven and let cool completely before serving. Cooling allows them to further crisp and makes breaking apart any melted slices easy.
Once cooled, enjoy the gluten-free, crunchy, and savory cheese crackers! Tweak bake time as needed for your desired crispness.
Air Fryer Instructions
Step 1: Cut parchment paper to fit the air fryer basket. I recommend a basket size of at least 5 quarts to allow enough room.
Step 2: Arrange cheese slices in a single layer in the basket, leaving some space in between to prevent sticking as they melt. You may have to work in batches depending on the size of your air fryer.
Step 3: Sprinkle a moderate, even layer of your desired spices over the cheese. I suggest red pepper flakes, garlic powder, paprika, salt, and pepper.
Step 4: Cook the keto cheese crackers at 350°F for 7-8 minutes. Flipping the crackers halfway through is also recommended for even crispness.
Step 5: Check frequently throughout cooking until edges brown and cheese releases easily from parchment. Additional baking time can vary based on the thickness of the cheese and the air fryer model.
Step 6: Transfer finished crisps immediately to a cooling rack to avoid excess cooking and help retain crispiness. Let fully cool before serving or storing.
Working in Smaller Batches: I recommend working in batches for even cooking results, allowing the air fryer to preheat back to temperature fully between each round.
The air fryer cuts down total prep and cook time with delicious crispiness! Adjust time as needed to taste.
Pro Tips For Crispy Cheese Crackers
Allow Sheet to Cool Between Batches
Letting the cookie sheet cool completely before adding more cheese ensures the crackers get crispy instead of sticking. Rotate between 2 pans.
Rotate Sheet Midway
Rotate the sheet 180 degrees halfway through bake time. The back of the oven bakes hotter, so this evens it out.
Freeze Cheese First
Very cold cheese holds its shape better before melting – less chance of slices spreading together.
Track Bake Time
Ovens vary – watch closely near the estimated time and continue baking if needed.
Use Moderate Seasoning
The spices add lots of flavor! Apply an even layer across slices. Too much can make cheese soft.
Cut Uniform Cheese
Use a pizza cutter to get neat, consistent squares of deli cheese.
Frequently Asked Questions
What Kind Of Cheese Works Best?
Sharp cheddar cheese and other semi-hard cheeses work well. Soft cheeses may not crisp up.
Can I Use Shredded Cheese Instead?
Yes, use shredded cheese in small piles instead of slices.
How Much Space Should I Leave Between Cheese Pieces?
Leave about 1 inch so they can melt without completely merging.
What If My Cheese Slices Merge Together?
They should easily break apart once cooled.
Should The Cookie Sheet Be Greased Or Lined?
Line with parchment paper (not to be confused with wax paper) so the cheese won’t stick.
How Do I Know When It’s Done Baking?
Look for lightly browned, crispy edges. Soft spots can bake longer.
What if my cheese isn’t crisping up?
Bake in 2-3 minute intervals until crispy.
How To Make Ahead & Store
Let cheese crackers fully cool after baking. For best results preserving crispness, transfer the cooled crackers to a plate or baking sheet and cover loosely with plastic wrap or foil—store at room temperature for up to 5 days. Avoid sealed containers or bags, as condensation can make them soggy.
Recipe Variations
- Use different cheese slices such as cheddar, Swiss, provolone, pepper jack, or a cheese blend.
- Add other spices or herbs like oregano, rosemary, garlic powder, and onion powder.
- Use a preheated stone baking sheet instead of a cookie sheet for crispier results.
- Bake at 300°F for a chewier texture or 350°F for extra crispy.
- Add toppings like sesame seeds, poppy seeds, everything bagel seasoning.
More Keto Snack Recipes:
- Cheesy Keto Sausage Balls Recipe
- Keto Buffalo Wings
- Hot Ham Roll Ups With Cheese
- Peanut Butter Balls

Easy 4-Ingredient Baked Cheddar Cheese Crackers [Keto & Gluten-Free]
Ingredients
- Cracker-Sized Deli Cheese Slices - I used Aged Cheddar, French-Swiss, DutchGouda, and Havarti
- 3/4 tsp Red Pepper Flakes
- 1/4 tsp paprika
- 1/4 tsp garlic powder
Instructions
Oven Instructions
- Preheat oven to 325°F.
- Cover cookie sheet with parchment paper.
- Lay cheese slices flat to fill the cookie sheet. Leave a little bit of room between each slice. It is no big deal if they melt together; they will break apart easily once they cool. I used precut slices, but you can buy larger deli slices and cut them into smaller squares.
- Sprinkle spices on cheese slices.
- Bake for 23 minutes.
- Remove from oven and allow to cool for 5 minutes before eating. Once they cool, you can easily break apart any cheese slices that have melted together.
- **Note: Baking time may vary due to variances in ovens and thickness of cheese. If the cheese isn't crunchy at 23 minutes, bake a little longer until they are. I would bake in 2-3 minute increments until they reach the desired crispness.
Air Fryer Instructions
- Cut parchment paper to fit the air fryer basket. I recommend a basket size of at least 5 quarts to allow enough room.
- Arrange cheese slices in a single layer in the basket, leaving some space in between to prevent sticking as they melt. You may have to work in batches depending on the size of your air fryer.
- Sprinkle a moderate, even layer of your desired spices over the cheese. I suggest red pepper flakes, garlic powder, paprika, salt, and pepper
- Cook the keto cheese crackers at 350°F for 7-8 minutes. Flipping the crackers halfway through is also recommended for even crispness.
- Check frequently throughout cooking until edges brown and cheese releases easily from parchment. Additional baking time can vary based on the thickness of the cheese and the air fryer model.
- Transfer finished crisps immediately to a cooling rack to avoid excess cooking and help retain crispiness. Let fully cool before serving or storing.
- Working in Smaller Batches: I recommend working in batches for even cooking results, allowing the air fryer to preheat back to temperature fully between each round.The air fryer really cuts down total prep and cook time with delicious crispiness! Adjust time as needed for your optimal texture. Enjoy your easy microwave cheese crackers!
Want to save this recipe?
Notes
- Allow cookie sheet to cool in between batches. Rotating halfway evens out the cooking.
- Freeze cheese before baking. Less risk of cheese spreading together.
- Adjust bake time as you go - Oven temps can vary.
- Watch closely near the end of bake time and continue cooking if not done.
- Add toppings very sparingly. Sprinkle lightly with seasoning.
- Use a pizza cutter to neatly cut slices of deli cheese.
Nutrition


")


Made the whole tray of cheese. Perhaps just one flavor at a time. Used parchment and no sticking. A bit chewy depending on cheese type. Some a bit more crispy. Learned not to try and fit too many on a tray. Cheddar did not spread but one of the whites did. I think it was the Harvarti. So will probably not combine 2 types on same tray. Mine all went in for 20-25 mins. Cheddar and Swiss better at 25 mins. The Harvarti better at 23 and the last one 20 mins or less actually. That one started to brown up the nicest. Spices I used…..I just sprinkled them on and mixed it up for a variety of different flavors dill, rosemary, pepper flakes and they all got onion and garlic powder. My paprika was not in supply over here. So never tried that.
Great! Thanks for sharing!
I just made these and I’m in heaven. I cooked them 25 minutes and topped them with Costco Pesto. Amazing.
Perfect! So glad you loved them!
Thank you for sharing this recipe. I’d been buying Whisps at Costco, which are just baked cheese crackers and very expensive, so I looked it up and found your page. I bought the same cheese pack and made them. They turned out crispy and delicious! I just have one question. The ones in your photos still look like nice little squares, but mine really spread out and don’t look like yours at all. Is there something you do so that they keep their shape?
I don’t do anything at all. It may just be a difference in the heat of our ovens. Or, mine may be spread further apart as they do spread out some. Sometimes they spread out more than others. Thankfully, they taste delish either way. I’m so glad you enjoyed them.
I just made these, and my husband said they may be the best thing I ever made. Then he quickly added, “Don’t get me wrong, you’ve made a LOT of good things”… but these are really delicious! Next I’m going to try to figure out how to adapt your recipe for the Ninja Foodi. Thanks so much for a wonderful recipe.
I’m so glad he loved them!! LOL! I don’t have a Ninja Foodie yet, but I have my eye on it.
O MY GOODNESS! I just made these with pepper jack and they are AMAZING!!! A bit to spicy for me but my husband will love them. I only had to bake for 15 minutes so win win for me. Thank you so much for sharing!
Perfect! So glad you loved them.
Mine got stuck to the paper and was a pain to take them off so I threw them out and just used the baking sheet for my remaining slices I had
You must have used wax paper because nothing sticks to parchment paper.
Curious what the nutritional value is for these? I want to make them but I don’t see it listed anywhere
I will depend on the exact cheese you use.
Oh my goodness I just made these exactly as you said and they’re amazing! Such a satisfying snack, thank you for sharing!!
Awesome! So glad you enjoyed!
They’re awesome ! Only problem is how do you easily remove them from wax paper mine were stuck
I only use parchment paper. I never use wax paper because everything sticks to wax paper.
I made these and they cooked away to the
Consistently of a cheese crisp, nothing that
Resembles a cracker. I was a little disappointed,
But they still tasted good; but very greasy. Had
To blot on paper towels.
These are keto friendly cheese crackers so you wouldn’t get the same consistency since there is no white fluffy gluten-filled flour. Also, cheese is greasy so that is expected. Allow to cool on paper towels and it will absorb the grease.
Has anyone ever tried to make these in an air fryer?
These are delicious! My husband loves them too.
Glad you enjoyed!
Hi, these sound great! Thanks for sharing. How do you store these and how long will they keep?
I store them in a zippered storage bag. In my house, they don’t last long because everyone eats them!! LOL!!
I added sesame seeeds to the seasonings. These are simple, delicious, and economical. Thank you for the recipe.
Glad you enjoyed!
Thank you Kasey! Your cheese crackers are absolutely delicious. They are easy too!
Since I live in Colorado I took some of the higher altitude suggestions mentioned above and baked at 300 degrees, checking at 30 minutes. I added another 5 minutes.
Crispy and spicy, I am all in.
Awesome! Glad you enjoyed!